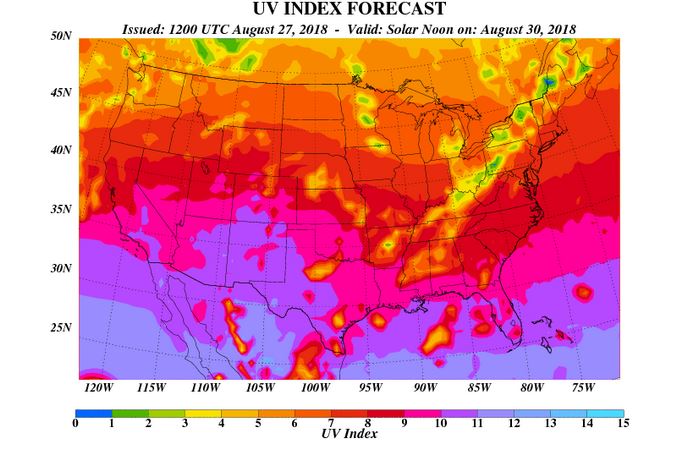
Thursday Aug. 30, 2018

First Aid Kit "On the Road Again" (2:27), "It's a Shame" (4:06), "Rebel Heart" (5:22), "Crazy on You" (4:55), "Fireworks" (4:19),
"Winter is All Over You" (4:49)


We'll be using page 105, page 106, page 15, page 16, page 12, page 13a, and page 13c from the packet of ClassNotes in today's class.

The first of this semester's Optional Assignments will be handed out in class today.  Optional Assignments are how you earn extra credit points in this class.  The assignment is due at the start of class next Tuesday (Sep. 4) though if you want to finish it in class and turn it in at the end of the period that is fine also.  Be sure to try to answer all the questions or you won't earn full credit (extra credit) on the assignment.

Scattering (splattering) of light

We'll start with the demonstration that was originally planned for Tuesday.  I'll probably use a green laser pointer (my most intense), not red laser light as shown below.

You are able to see a lot of things in the atmosphere (clouds, fog, haze, even the blue sky) because of scattering of light.  We'll try to make a cloud of smog in class later today.  The individual droplets making up the smog cloud are too small to be seen by the naked eye.  But you will be able to see that they're there because the droplets scatter light.  That's true also of the little water droplets that make up a cloud.  So we need to take some time for a demonstration to see exactly what light scattering is. 

In the first part of the demonstration a narrow beam of intense red laser light was directed from one side of the classroom to the other. 

The following 3 figures are on Page 105 in the ClassNotes


We're looking down from above  in the the figure above.  Neither the students or the instructor could see the beam of light.  To see the laser light some of it would need to be traveling toward you rather than from one side of the room to the other. 


The instructor would have been able to see the beam if he had stood at the end of the beam of laser light where it hit the wall and looked back along the beam of light toward the laser.  The insert at upper right shows what the instructor would see, a bright spot of light originating at the end of the laser tube itself.   That wouldn't have been a smart thing to do, though, because the beam was strong enough to possibly damage his eyes (there's a warning on the side of the laser). 

Everybody was able to see a bright red spot where the laser beam struck the wall. 


This is because when the intense beam of laser light hits the wall it is scattered (I think splattered is a more descriptive term).  The original beam is broken up into a multitude of weaker rays of light that are sent out in all directions.  There is a ray of light sent in the direction of every student in the class.  They see the red spot of light because they are looking back in the direction the ray came from.  It is safe to  look at this light because the original intense beam is split up into many much weaker beams.

Next we clapped two erasers together so that some small particles of chalk dust fell into the laser beam. 

The next 2 figures are on page 106 in the ClassNotes.


Now instead of a single spot on the wall, students saws lots of points of light coming from different positions along a straight segment of the laser beam.  Each of these points of light was a particle of chalk, and each piece of chalk dust was intercepting laser light and sending light out in all directions.  Each student saw a ray of light coming from each of the chalk particles.  With a cloud of chalk dust you are able to see segments of the laser beam.

We use chalk because it is white, it will scatter rather than absorb visible light.  What would you have seen if black particles of soot had been dropped into the laser beam?

In the last part of the demonstration we made a cloud by pouring some liquid nitrogen into a cup of water.  The cloud droplets are much smaller than the chalk particles but are much more numerous.  They make very good scatterers.


The beam of laser light was very bright as it passed through the small patches of cloud.  The cloud droplets did a very good job of scattering laser light.  So much light was scattered that the spot on the wall fluctuated in intensity (the spot dimmed when lots of light was being scattered, and brightened when not as much light was scattered).  Again the insert shows what you would see if you stood at the wall and looked back toward the laser.  Some of the light passes through the cloud so you would still be a spot of red light, but it would be weaker and more diffuse.  Then you would see red scattered light coming from the cloud surrounding the beam of laser light.

Here's a side view photo that I took back in my office.


The laser beam is visible in the left 2/3 rds of the picture because it is passing through cloud and light is being scattered toward the camera.  There wasn't any cloud on the right 1/3rd of the picture so you can't see the laser beam over near Point 1.

The air molecules in the room are actually scattering laser light but it's much too weak for us to be able to see it.  When a stronger light source (sunlight) shines through much more air (the entire atmosphere) we are able to see the scattered light.  The blue light that you see when you look at sky is sunlight being scattered by air molecules.  This will probably be the topic of another 1S1P assignment.


Now back to ozone


Here's a good complete discussion of the different UV Index levels from the US Environmental Protection Agency (https://www.epa.gov/sunsafety/uv-index-scale-0)


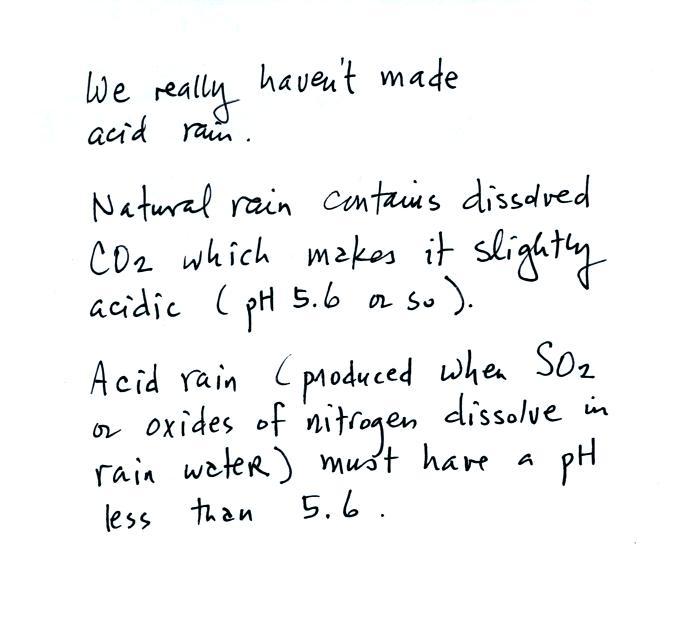
Ozone in the troposphere (surface level ozone in the figure above) is bad, it is toxic and a pollutant.  Tropospheric ozone is also a key component of photochemical smog (also known as Los Angeles-type smog)


We'll be making some photochemical smog in a class demonstration.  To do this we'll first need some ozone; we'll make use of the simple stratospheric recipe for making what we need instead of the more complex tropospheric process (the 4-step process in the figure below).  You'll find more details a little further down in the notes.


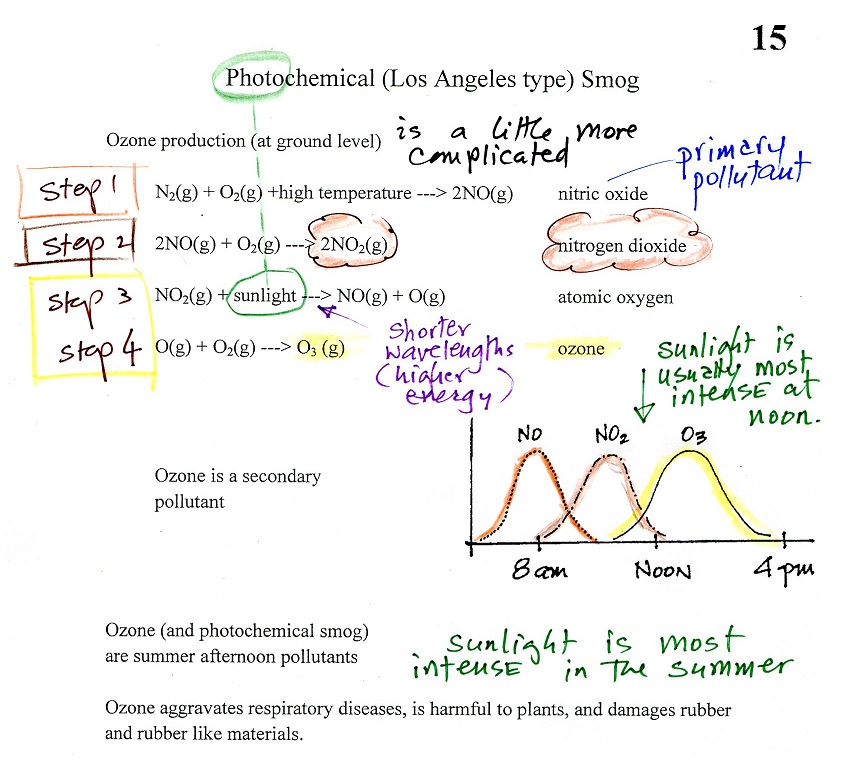
A more complex series of reactions is responsible for the production of tropospheric ozone. 
The production of tropospheric ozone begins with nitric oxide (NO).  NO is produced when nitrogen and oxygen in air are heated (in an automobile engine for example) and react. 

The NO can then react with oxygen in the air to make nitrogen dioxide, the poisonous brown-colored gas that I used to make in class.

Sunlight can dissociate (split) the nitrogen dioxide molecule producing atomic oxygen (O) and NO.  O and O2 react in a 4th step to make ozone (O3) just like happens in the stratosphere.  Because ozone does not come directly from an automobile tailpipe or factory chimney, but only shows up after a series of reactions in the air, it is a secondary pollutant.   Nitric oxide (NO) would be the primary pollutant in this example.

NO is produced early in the day (during the morning rush hour).  The concentration of NO2 peaks somewhat later.  Because sunlight is needed in step #3 and because sunlight is usually most intense at noon, the highest ozone concentrations are usually found in the afternoon.  Ozone concentrations are also usually higher in the summer when the sunlight is more intense than at other times of year.

The American Lung Association's 2018 State of the Air report mentions that 11 of the 25 cities with the highest tropospheric ozone concentrations are found in California (Los Angeles is at the top of the list).  Two cities are found in both Texas and Colorado, one each in Arizona (Phoenix), Utah and Nevada.  Here's a link to the full report (167 pages long).  Here's a shorter report with the lists of most polluted cities.  Here a list of the cities in the United States with the cleanest air.

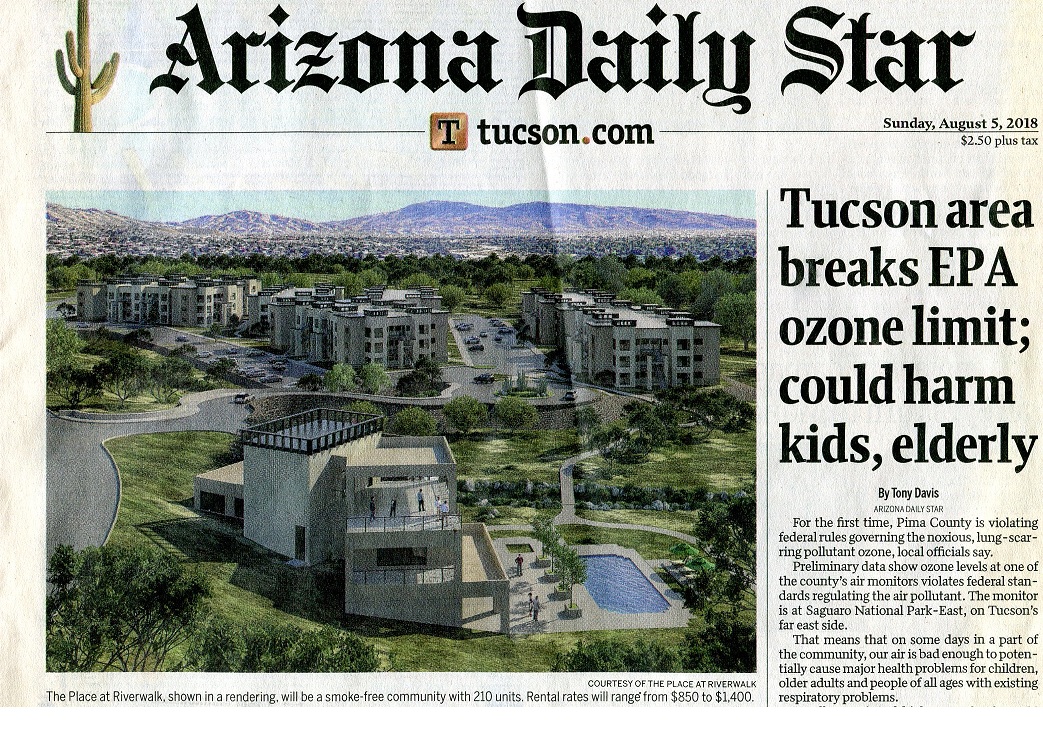
Earlier this month Tucson exceeded the EPA NAAQS for ozone for the first time. Phoenix had already exceeded the NAAQS 39 times this year.  Here's a link to the entire article.


The violation in Tucson, which could impact the availability of federal transportation funds, is partly because the allowed ozone concentration is lower than it used to be (80 parts per billion (ppb) averaged over an 8 hour period to 75 ppb in 2008 to 70 ppb in 2015).

Photochemical (LA-type) smog

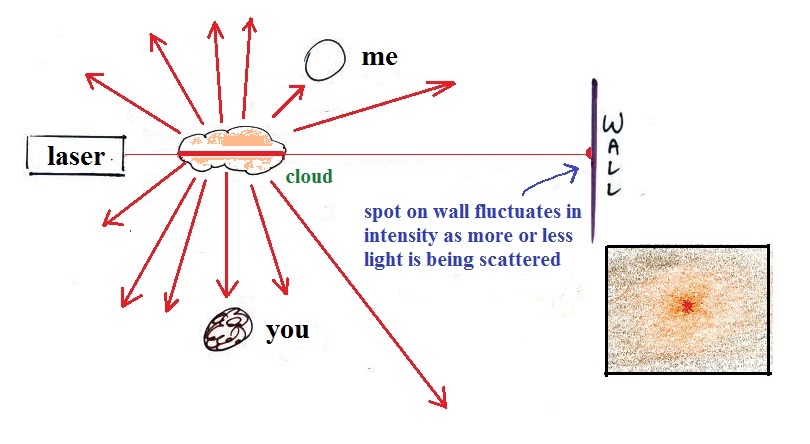
Once ozone is formed, the ozone can react with a hydrocarbon of some kind to make a product gas.  The ozone, hydrocarbon, and product gas are all invisible, but the product gas sometimes condenses to make a visible smog cloud or haze.  The cloud is composed 
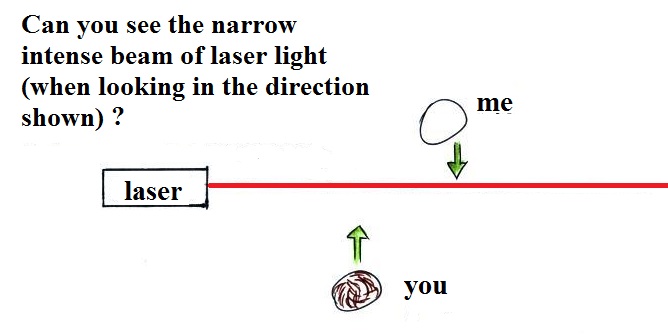
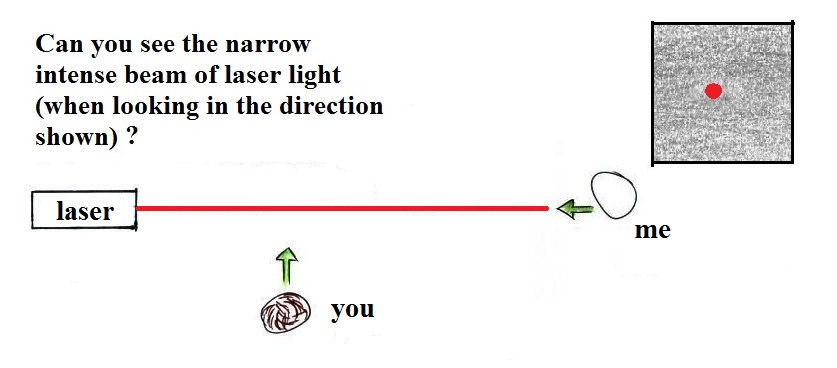
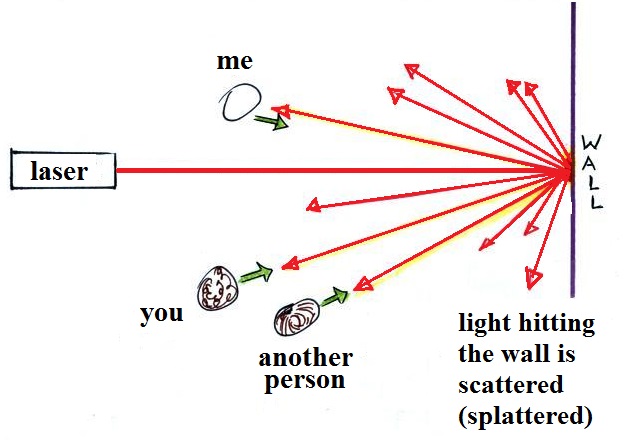
of very small droplets or solid particles.  They're too small to be seen but they are able to scatter light - that's why you can see the cloud.

Photochemical smog demonstration
Here's a pictorial summary of the photochemical smog demonstration.


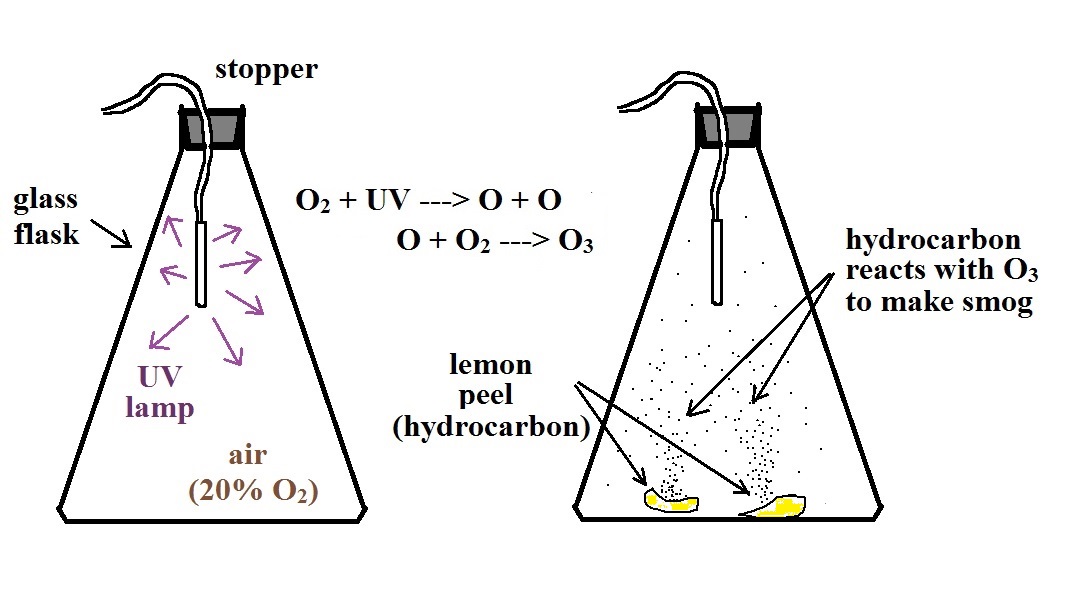
We started by putting a small "mercury vapor" lamp inside a flash.  The bulb produces a lot of ultraviolet light (the bulb produced a dim bluish light that we could see, but the UV light is invisible so we had no way of really telling how bright the bulb was).  The UV light and oxygen in the air produced a lot of ozone (you could have easily smelled it if you had taken the cover off the flask).

After a few minutes we turned off the lamp and put a few pieces of lemon peel into the flash.  Part of the smell of lemon is limonene, a hydrocarbon.  The limonene gas reacted with the ozone to produce a product gas of some kind.  The product 
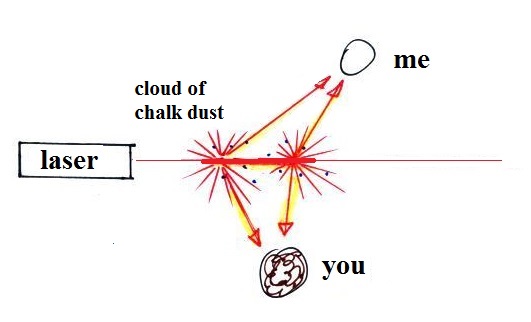
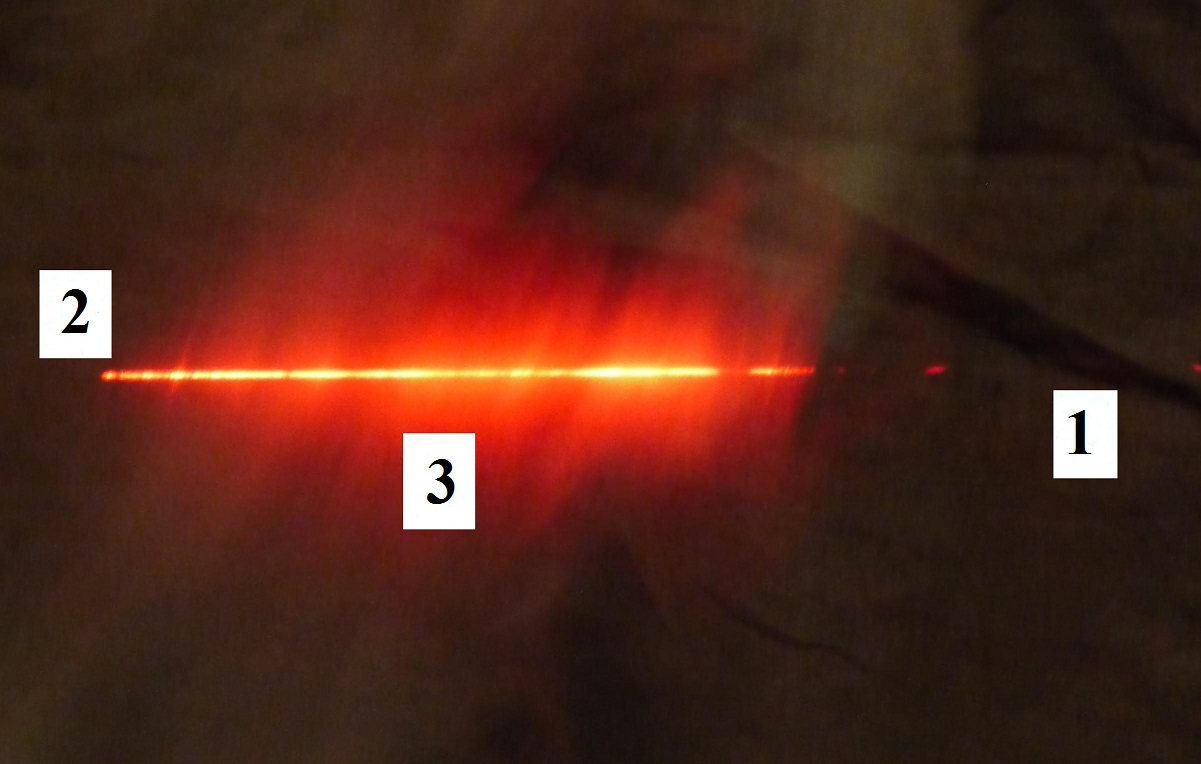
gas condensed, producing a visible smog cloud   We shined the laser beam through the smog cloud to reinforce the idea that we are seeing the cloud because the drops or particles scatter light.

Here's a video that I found of a slightly different version of the demonstration (you really don't miss much if you don't come to class).  Instead of using UV light to produce the ozone the demonstration uses an electrical discharge (the discharge travels from the copper coil inside the flask to the aluminum foil wrapped around the outside of the flask).  The overall effect is the same.  The discharge splits an oxygen molecule O2 into two oxygen atoms.

O2  + spark  ---> O + O

One of the oxygen atoms reacts with an oxygen molecule to form
O3 
O + O2  ---> O3 

The smog cloud produced in the video is a little thicker than the one produced in class.  I suspect that is because they first filled the flask with pure oxygen, 100% oxygen, before making the ozone.  I used air in the room which is 20% oxygen.  More oxygen in the flask means more ozone and a thicker cloud of Los Angeles type smog.


Volcanic smog (vog) and laze (lava and haze)
Volcanic smog can form when the sulfur dioxide (SO2) from an erupting volcano reacts with oxygen and moisture.  The product of the reaction can form small drops or particles that  begin to scatter light and lower the visibility. 


Diamond Head is just visible in this picture of volcanic smog in Honolulu.  This picture (Marco Garcia, AP) was published in the Seattle Times on May 6, 2008 (http://old.seattletimes.com/html/nationworld/2004394494_hawaii06.html).  Kiluaea was erupting at that time also.  The volcanic smog can kill crops and cause respiratory problems.  The vog can also spread to nearby Pacific islands. 

An entirely different type of haze cloud is formed when hot molten lava pours into the ocean as shown in the photo below (photo credit: Brocken Inaglory in https://en.wikipedia.org/wiki/Laze_(geology) )


In this case the hot lava splits water molecules into hydrogen and oxygen ions.  The hydrogen ions react with chlorine ions from dissociated salt (sodium chlorida NaCl) in the ocean water.  The sudden cooling of lave creates small fragments of glass.  You are left with a haze cloud consisting of small droplets of hydrogen chloride (hydrochloric acid) and particles of glass.  The dangerous haze cloud can cause skin and eye irritation, lung damage, even death.


Acid rain

Sulfur dioxide is one of the pollutants that can react with water in clouds to form acid rain (some of the oxides of nitrogen can also react with water to form nitric acid).  The formation and effects of acid rain are discussed on page 12 in the photocopied Class Notes.


Acid rain is often a problem in regions that are 100s even 1000s of miles from the source of the sulfur dioxide.  Acid rain in Canada could come from sources in the US, acid rain in Scandinavia came from industrialized areas in other parts of Europe. 

Note at the bottom of the figure above that natural "pristine" rain has a pH less than 7 and is slightly acidic.  This is because the rain contains dissolved carbon dioxide gas.  The acid rain demonstration described below and done in class should make this point clearer.


Some of the problems associated with acid rain are listed above.

Acid Rain Demonstration

Some common acids are listed below In solution the acid molecules dissociate (split) into pieces.  The presence of H+ ions is what makes these materials acids.
  Much of what follows is on page 13a in the ClassNotes.


And actually it isn't enough to just have H+ ions for something to be an acid.  There are H+ ions in pure distilled water and it's not an acid.  To be an acid the H+ ion concentration must be greater than is found in distilled water.  The H+ ion concentration in distilled water is 10-7 moles of H+ ions per liter of water.  A mole is just a number, a very large number (6 x 10²³).  It's the same idea as dozen.  A dozen means you've got 12 of something.   10-7 moles of H+ ions per liter is 10-7 times 6 x 1023  =  6 x 10¹⁶ H+ ions per liter of water.  

The pH scale
We often use the pH scale to measure acid concentration.  An H+ ion concentration of 10-7 moles/liter corresponds to pH 7 (the pH value is computed by taking the
-log10 of the H+ ion concentration).   Other than remembering the pH value of distilled water is pH7, these are all details you don't need to worry about.
 
It is also possible to have fewer H+ ions in a solution than would be found in distilled water.  A solution like this is basic.


Pouring some acid into water would increase the H+ ion concentration (from 10-7moles/liter to 10-3moles/liter, perhaps as shown in the example above).  Adding a base to water will decrease the H+ ion concentration (from 10-7moles/liter to 10-10moles/liter, perhaps).

Now we can proceed with the demonstration.  We will start with three 1000 mL beakers each filled with distilled water.  Some vinegar (contains acetic acid) was added to the left beaker. Some ammonia (a base) was added to the right beaker.

Acid/Base indicator solution
Then we added some bromothymol blue, a color indicator solution, to all three beakers.  Bromothymol blue has the amazing property of changing color depending on whether it is mixed with an acid (golden yellow) or a base (deep blue).


So far we have just reviewed the pH scale and introduced acid/base indicator solutions.

When sulfur dioxide is released into the air it reacts with the water in clouds to produce acid rain.  I really can't use SO2 in class because it's poisonous.  I'll use carbon dioxide, CO2, instead.


We added some Tucson tap water to a large 2000 mL beaker.  This represents a cloud.   We added some bromothymol blue to the tap water and it turned blue.  So we know that Tucson tap water is basic. 

A few small pieces of dry ice are put into a flask.  We close the flask with a stopper.  The end of a piece of tubing connected to the flask is immersed in the tap water.

Dry ice sublimes.  It turns directly from solid to ice (ordinary ice melts and turns from solid to liquid).  The gaseous CO2 is invisible but you can tell it is there because of the bubbles in the tap water.  Some of the CO2 dissolves as it bubbles through the water and slowly turns the water acidic.  You can tell that this is occurring because the bromothymol blue indicator turns from deep blue to green and eventually to yellow.


I call this a "sort of" acid rain demonstration.  That's because we haven't really produced acid rain.  Air contains carbon dioxide and the CO2 makes natural rain slightly acidic (pH5.6 or so).  To make true acid rain we would need a different gas, something other than carbon dioxide, something that would lower the pH below 5.6.

Ocean Acidification
While we didn't actually produce acid rain, there is concern that increasing atmospheric concentrations of carbon dioxide will dissolve in ocean water and lower the pH of the world's oceans (see https://oceanservice.noaa.gov/facts/acidification.html).  This could in turn affect organisms in the ocean especially those that make shells.


We'll finish by mentioning carbonated beverages which contain dissolved carbon dioxide and are acidic.  Soft drinks also contain phosphoric acid which makes them even more acidic than the dissolved carbon dioxide would do.  With time the acidity of soft drinks can damage tooth enamel.


Particulate matter (PM)

The last pollutant that we will cover is Particulate Matter (PM).  This is small solid particles or drops of liquid, not gases, that remain suspended in the air.  Here today we'll try to focus on the sizes of particulate matter and why that is important.


Carbon monoxide (CO),
O3 , and Particulate Matter are the three main pollutants of concern in Tucson.  PM is a year round problem in Tucson.

I don't think I mentioned in class today that PM pollution is often split into two groups: PM10 and PM2.5.  These refer to particles with diameters less than 10 micrometers and 2.5 micrometers, respectively.  A micrometer (µm) is one millionth of a meter (10-6 m).   You'll find examples of metric distances ranging from kilometers to nanometers at this interesting site.  The following is on page13c in the ClassNotes.


Sizes (in µm) of some common items are sketched above.  Don't worry about the medical terms (bronchi, bronchioles, alveoli), you'll find an illustration and a little more explantion in the Tue., Sept. 4 notes

Better than sketches are some actual photographs.  Many of these particles are so small that they are invisible to the naked eye and need to be examined using a microscope.

We were running short of time and I didn't show these photographs in class
Photographs of micrometer and 10s of micrometer size objects


Electron microscope photograph of human red blood cells..
Individual cells in this example are a little over 5
µm in diameter.
This is not something you'd find in the atmosphere.
 (
image source: Dartmouth College Electron Microscope Facility)


This is something that is commonly found in the air.  This is a photograph of a mixture of different types of pollen. 
The largest pollen grain comes from morning glory (I think) and is about 100
µm in diameter
(image source: Dartmouth College Electron Microscope Facility)


Scanning electron microscope photograph of volcanic ash
(USGS image by A.M. Sarna-Wojcick from this source)


Airborne particulate matter collected on the surface of a tree leaf (source).  These particles are pretty small with diameters of 1 to 2 µm.
 According to the source, trees capture appreciable amounts of particulate matter and remove it from the air in urban areas.